Pruning is something I have never done much for various reasons so I am keen to learn more.
This early morning it was raining so we did not go out straight away, and I took the opportunity to try and sharpen my secateurs on my own.
I popped into the toolshed and observed a colleague doing it, then I did it myself, first disassembling… then sharpening and finally reassembling the lot. I reckon I made the edge a bit too wide in the middle and a colleague said it might have been made sharper, but it was a good start.


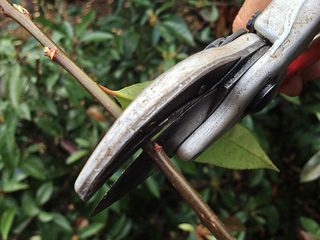
Then, one of my fab colleagues spent some times explaining to me how to use the said secateurs properly – I know, it’s probably basic stuff, but it is the little things that make a difference. She explained that the anvil blade helps protect buds when you cut over them…

… and that, if you need a neat cut, you have to use your secateur from the blade side, making sure you leverage on it, through the opposite handle, so as not to bruise the stem.
She also advised on a book on pruning that I have bought… my journey towards learning how to prune properly is ongoing, but every day I am realising something more.
 The rest of the day I spent working with Rubus again, trying to apply my colleague’s advice while cutting it back, in particular by avoiding leaving stumps that will eventually die back and be unsightly, besides being bad practice as in many plants they might lead to colonisation by fungus coral spot (Nectria cinnabarina).
This being what I have to deal with in terms of spines, it was a rather slow task to carry out, but by the end of the day I was really satisfied with my work and rather happy.
I think the before and after pictures below show it’s totally worth all the scratches 🙂


 M.Paola, that’s me
